How to Install an eSIM on Google Pixel: Full Walkthrough
September 22, 2026
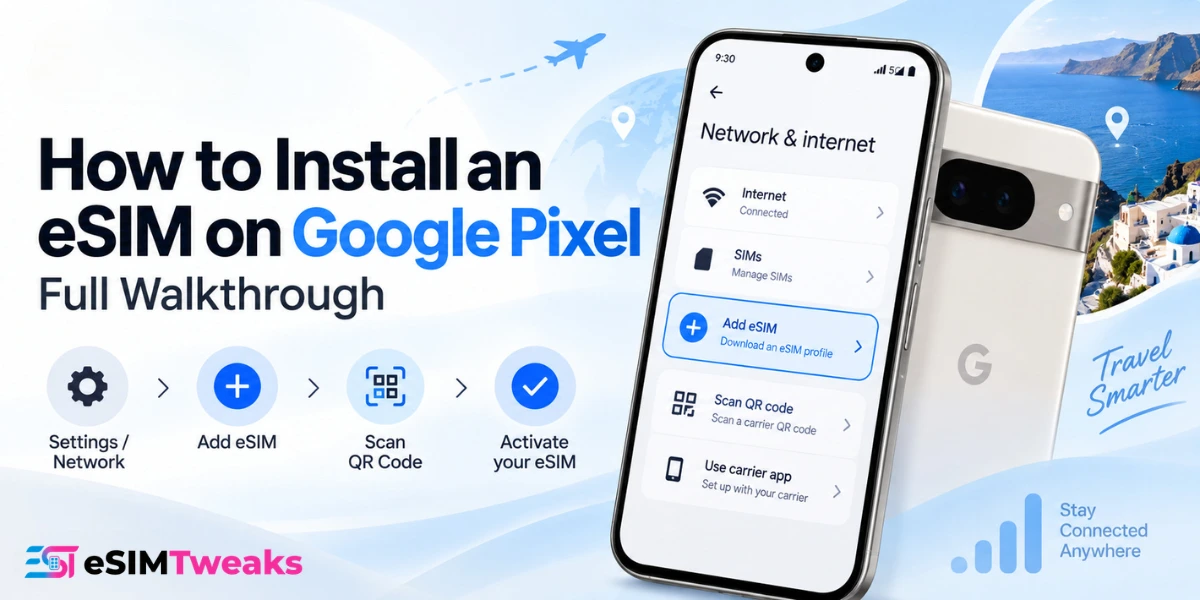
To install an eSIM on Google Pixel, go to Settings > Network & internet > SIMs > Add SIM > Set up an eSIM, then scan the QR code your provider emailed you.
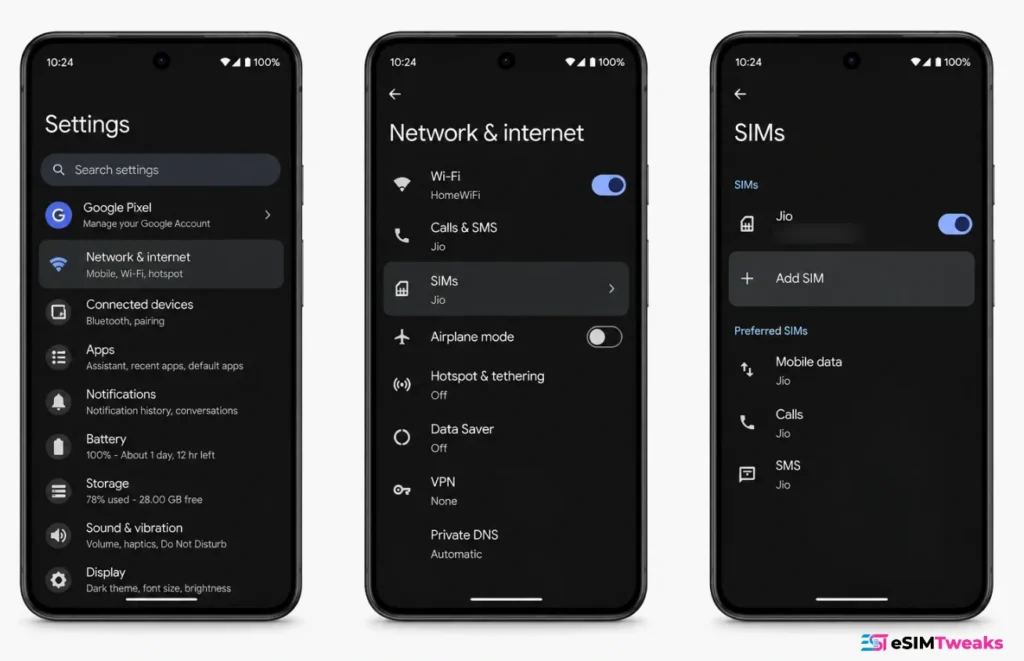
The whole eSIM Google Pixel setup takes under two minutes on Wi-Fi, and the step by step walkthrough below covers the QR method, manual entry and device transfer.
Every Pixel from the Pixel 4 onward supports eSIM without exception. Pixel 3 and 3a have regional gaps. US models of the Pixel 10, 10 Pro and 10 Pro XL have no SIM tray at all, so eSIM is the only option on those handsets.
The steps below are current for Android 17, which reached stable on Pixel 6 and later on 16 June 2026. The menu paths have not changed across Android 15, 16 and 17.
Google Pixel eSIM support by model
| Model | eSIM support |
|---|---|
| Pixel 2 | Only units bought with Google Fi service |
| Pixel 3 / 3 XL | No eSIM on US and Canadian carrier units except Sprint and Google Fi. No eSIM on units bought in Australia, Taiwan or Japan |
| Pixel 3a / 3a XL | No eSIM on Verizon units or units bought in Japan |
| Pixel 4, 4a, 5, 5a | Full support |
| Pixel 6, 6a, 6 Pro, 7 series, Fold | Full support |
| Pixel 8, 9, 9 Pro Fold, 10 series | Full support |
| Pixel 10 / 10 Pro / 10 Pro XL, US models | eSIM only, no physical SIM tray |
Two details worth knowing before you buy a prepaid travel data plan.
The Pixel 10 Pro Fold keeps its physical tray in every market including the US. And a Pixel bought carrier locked in the United States will refuse third party eSIM downloads entirely until it is unlocked, which is the single most common reason a perfectly good travel eSIM fails to install.
If you are unsure what an eSIM actually is before you start, our plain English explainer covers the mechanism.
Before you install: three things to get right
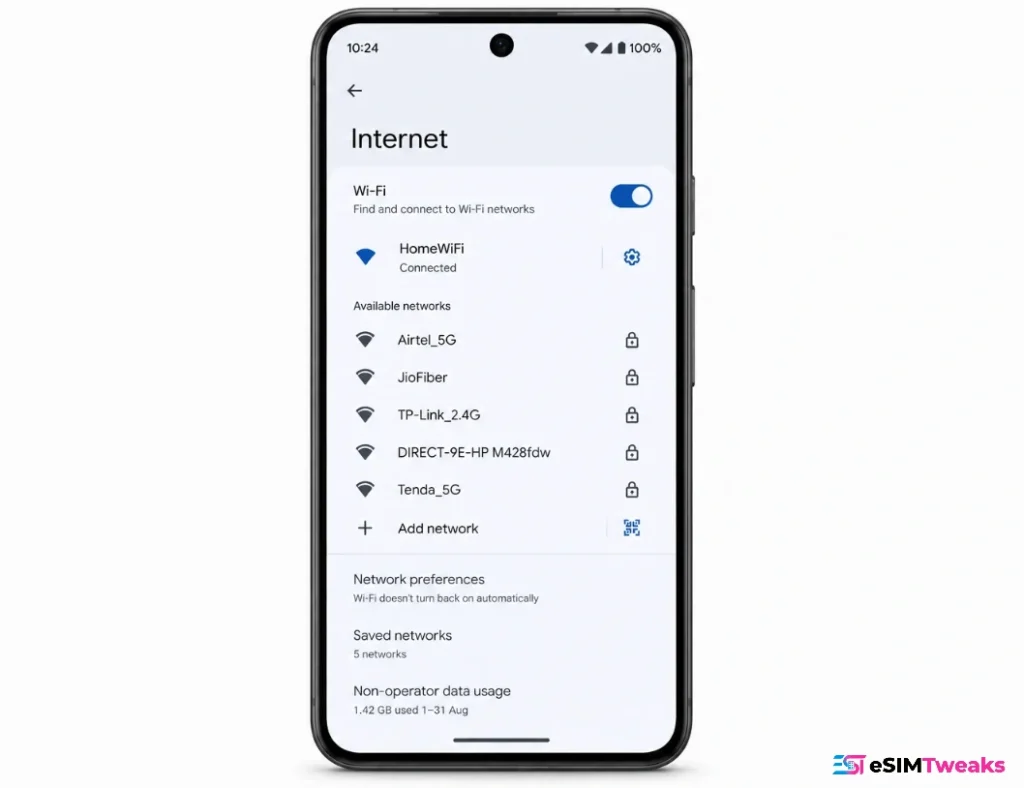
Installing an eSIM on Google Pixel without Wi-Fi rarely goes smoothly.
Downloading a profile needs an internet connection, and you will not have one at an airport before your data line is live.
Almost every travel provider sells plans that only start counting down when the eSIM first connects to a network abroad, so buying a week early costs you nothing.
Hotel and airport networks that make you accept terms on a splash page frequently block the download. Use home Wi-Fi or a network you already trust.
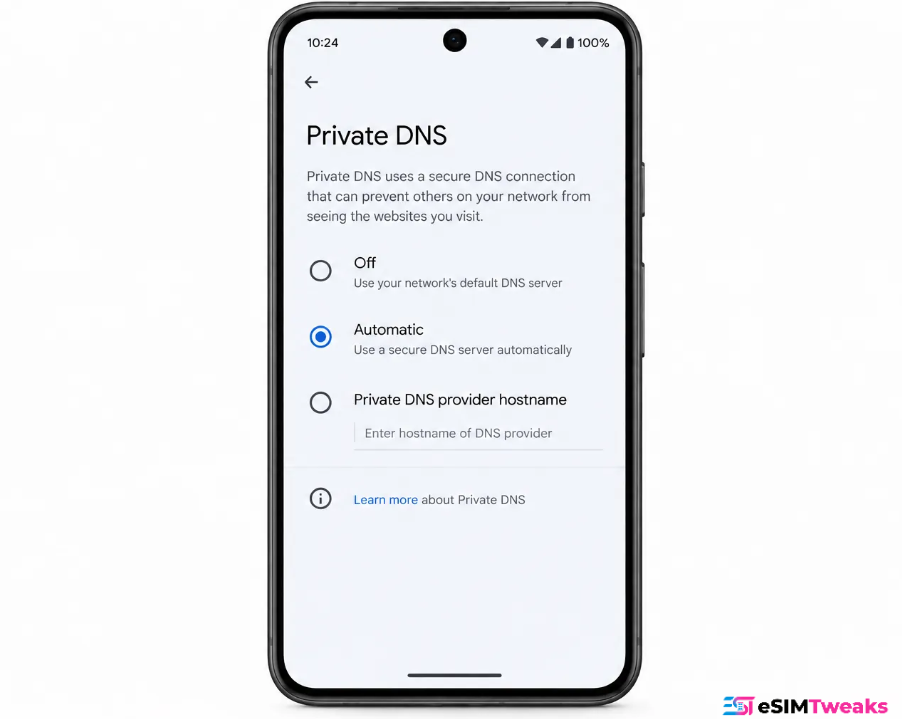
Some Private DNS providers block the SM-DP+ server your phone needs to reach. The path is Settings > Network & internet > Private DNS.
Set it to Automatic or Off, install the eSIM, then set it back.
Method 1: install with a QR code
This is the standard route and the one your provider will assume you are using.
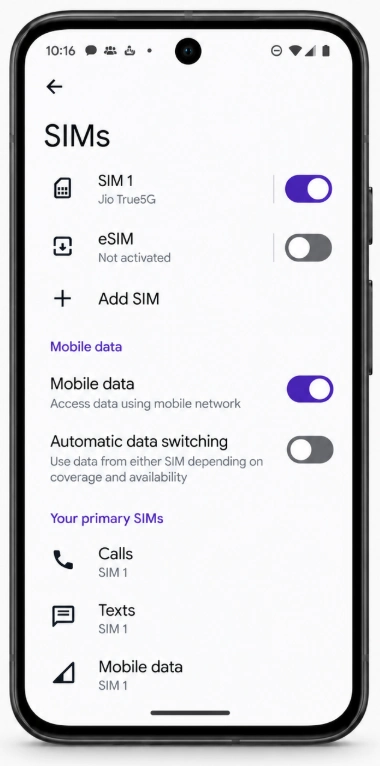
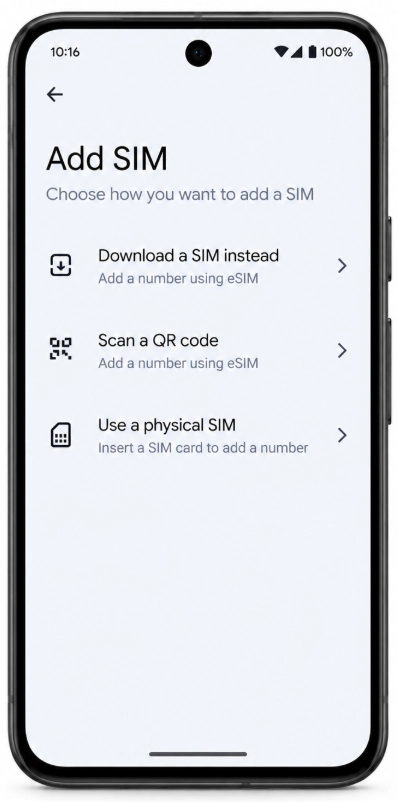
Step 1. Open the SIM settings
Go to Settings > Network & internet > SIMs.
If you already have an active SIM, tap Add SIM, then Set up an eSIM.
If the phone has no active SIM at all, the screen shows “Download a SIM instead?” instead. Tap that, then Next.
Step 2. Scan the code
The camera scanner opens automatically.
Point it at the QR code your provider emailed you.
Display the code on a laptop or a second phone rather than trying to scan a screenshot on the same device, which does not work.
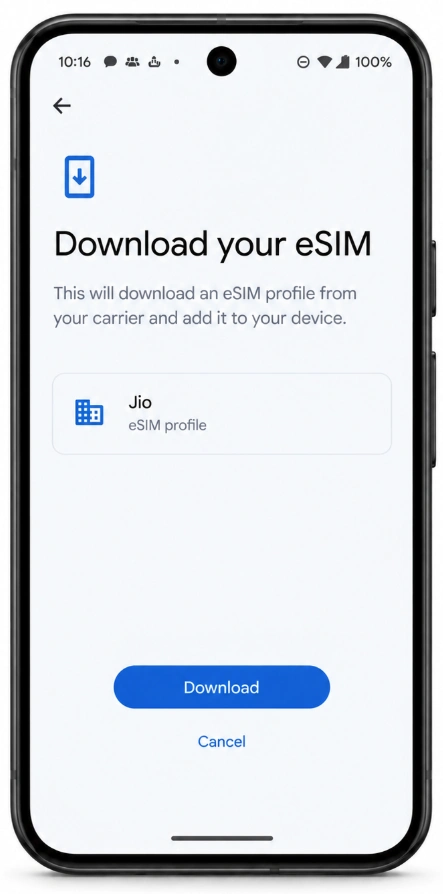
Step 3. Confirm the download
Tap Download.
The profile transfers in roughly 20 to 60 seconds depending on your connection.
Do not lock the screen or switch apps while it runs.
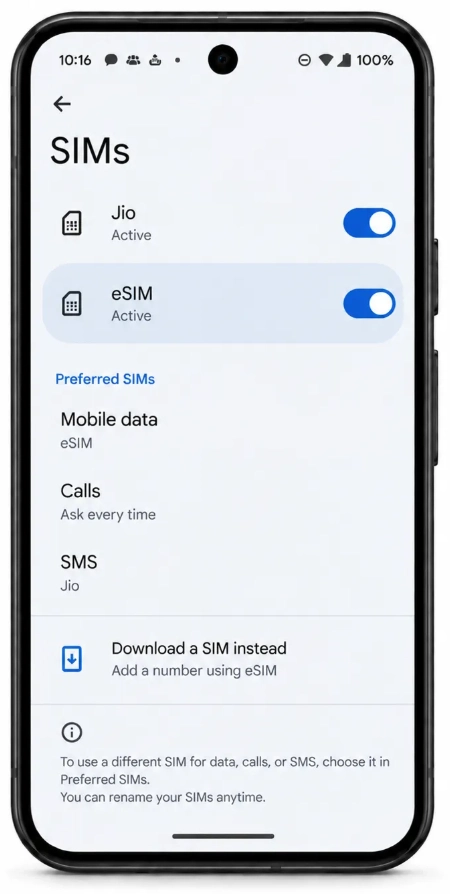
Step 4. Name the line and finish
Pixel does not prompt you to label the line the way iPhone does.
The name comes from whatever string the carrier attached to the profile, which is often unhelpful.
You can rename it later from the SIMs screen.
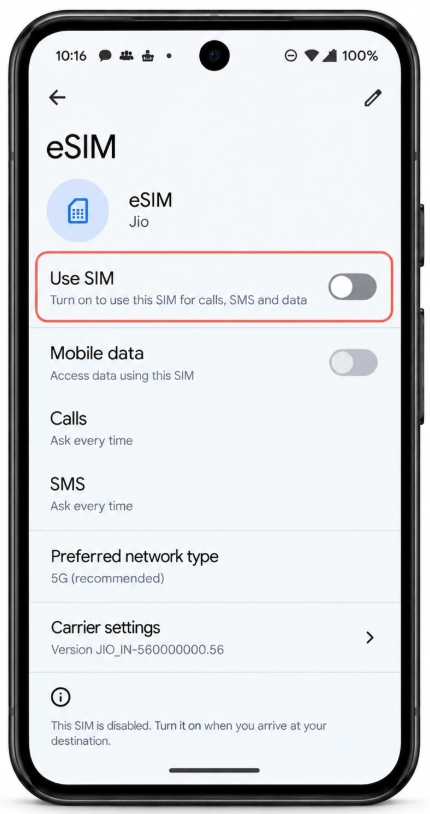
Step 5. Leave it switched off until you land
Once installed, toggle Use SIM off for that line.
It stays on the phone, dormant, until you arrive.
This is the step that stops a plan burning validity while you are still at home.
Method 2: install an eSIM on Pixel without a QR code
Some providers send an activation string rather than a QR image, and some QR codes simply refuse to scan. This is the manual route, and it is how you install an eSIM on Pixel without a QR code at all.
Pixel handles manual entry differently from iPhone, and the difference catches people out.
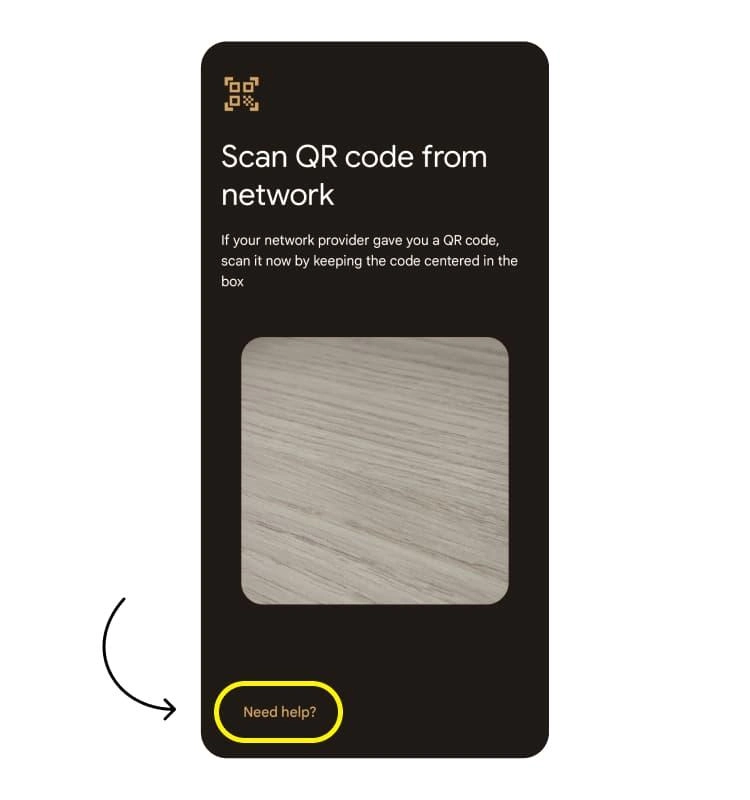
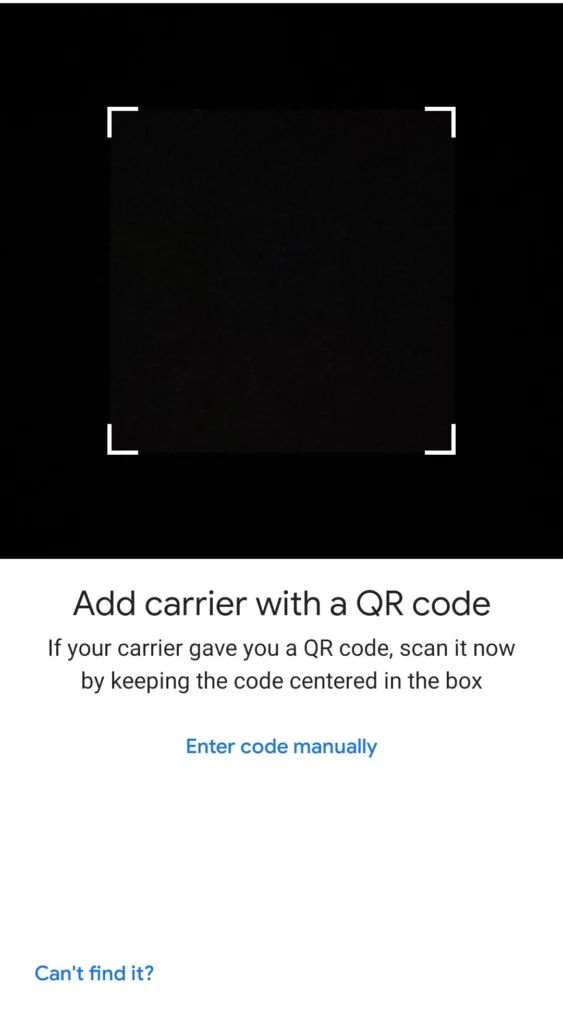
The important difference: Pixel takes the entire GSMA string in one field. It looks like this:
LPA:1$consumer.example-provider.com$K2-A1B2C3D4E5F6
iPhone splits that into separate SM-DP+ address and activation code boxes. Pixel does not. If your provider gives you two separate values, join them in the format above, with LPA:1$ at the front and a dollar sign between the address and the code.
Method 3: transfer an eSIM from another phone
From another Android phone
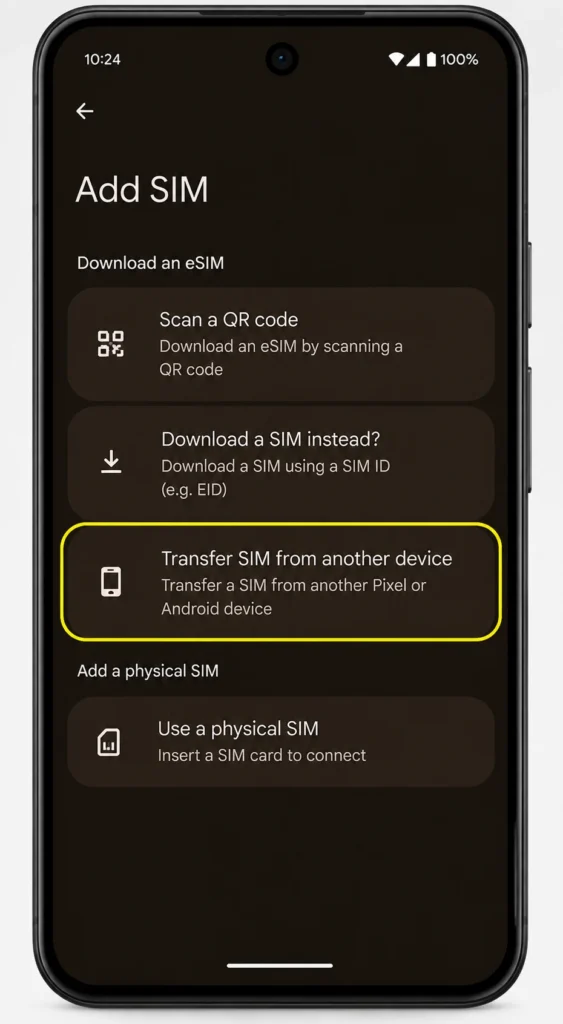
Go to Settings > Network & internet > SIMs > Add SIM > Transfer SIM from another device.
Both phones need Android 12 or later, current Google Play Services, and a screen lock enabled on each.
The screen lock requirement is not optional and the transfer fails silently without it.
From an iPhone
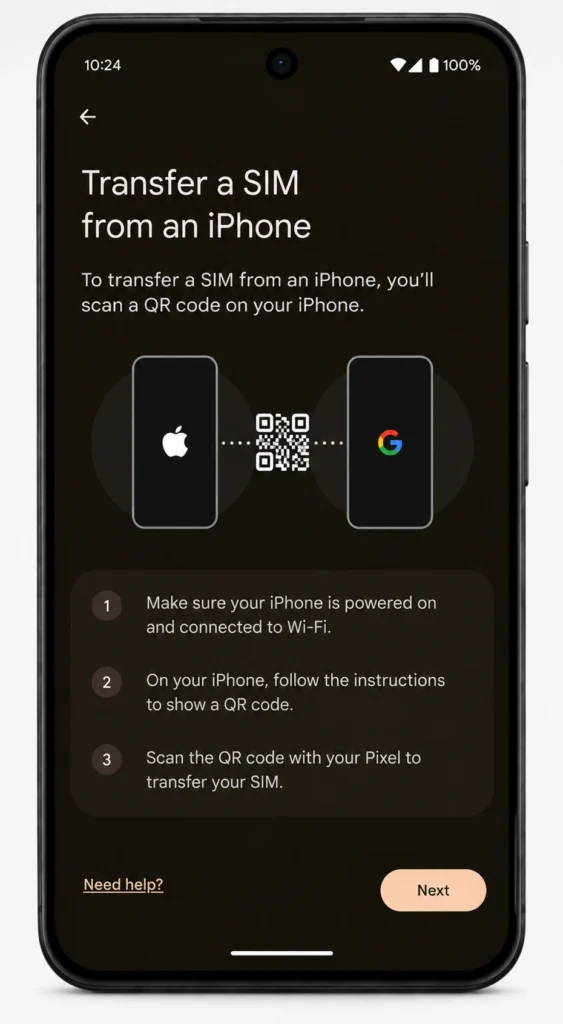
Go to Settings > Network & internet > SIMs > Add SIM > Transfer a SIM from another phone > iPhone, then pair the two devices with the on screen QR code.
The iPhone must stay powered on throughout.
This route needs iOS 26 or later and a carrier on Google’s supported list, which currently includes AT&T, Bell,
Deutsche Telekom, EE, Google Fi, KDDI au, Orange France, SFR, Swisscom, T-Mobile, Telus, UQ mobile, Verizon and Virgin Plus.
Travel eSIM providers are generally not on that list. Transfer works for your home line, not for a holiday plan.
Finding your EID
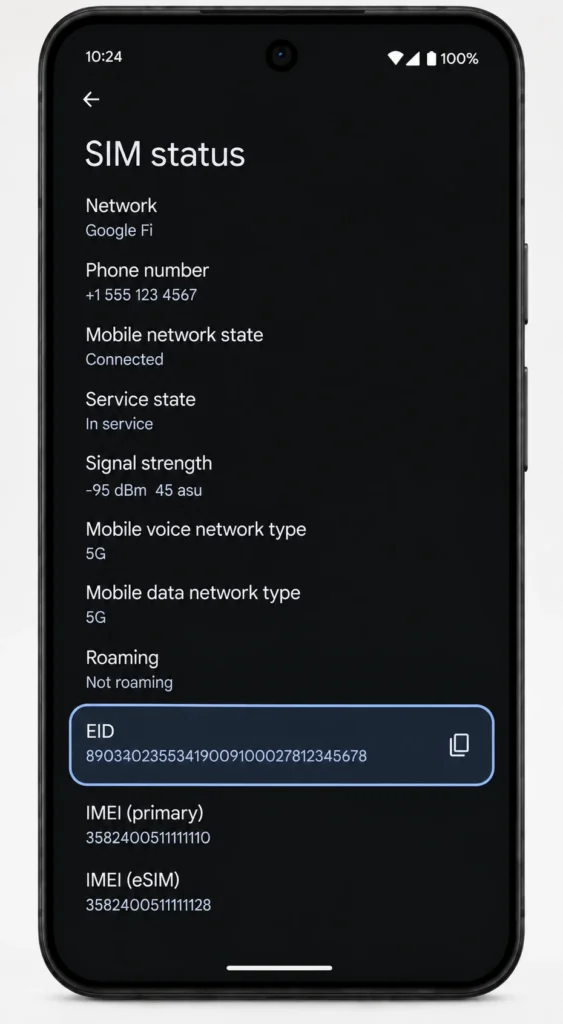
Some providers ask for your EID before they will issue a profile. On Pixel:
Settings > About phone > SIM status, then look for EID.
If a shop assistant needs it as a scannable code, there is a separate path: Settings > Network & internet, tap Add next to Mobile network, tap “Download a SIM instead?”, tap Next, then “Activating in a store?”.
The *#06# dial code returns the EID on some Android builds but Google does not document this behaviour for Pixel, and it varies between versions.Use the Settings path.
Setting up dual SIM properly
This is where most travellers lose money, so it is worth doing carefully.
Everything sits under Settings > Network & internet > SIMs. With two lines installed, tabs appear at the top to switch between them. Set three defaults on that screen:
| Setting | What to choose abroad |
|---|---|
| Calls | Your home line, or “Ask every time” |
| Texts (SMS) | Your home line, so bank codes still arrive |
| Mobile data | Your travel eSIM, which becomes the default line for data |
Then the critical part. Select the travel eSIM’s tab and turn on Roaming inside that line’s page only. Roaming is a per subscription setting on Android. Leaving it off on your home line is what prevents your normal carrier billing you for data you never meant to use.
Android allows only one active data line at a time, so you cannot split traffic between two lines by app the way some people expect.
Dual SIM eligibility: one physical SIM plus one eSIM works on Pixel 3a and later, excluding Japan bought 3a units.
Running two eSIMs active at once needs a Pixel 7 or later with carrier support for multiple enabled profiles. The Pixel 10 stores eight or more profiles and keeps two active simultaneously.
When the eSIM installs but data does not work?
Signal bars with no working data is the most common Pixel complaint, and it is usually one of four things.
The APN is missing. Most mainstream providers configure this automatically, but not all. Go to Settings > Network & internet > SIMs, select the eSIM, then Access Point Names.
Tap +, fill in the Name and APN fields with the values your provider supplied, open the three dot menu, tap Save, then select the new APN’s radio button. An APN saved but not selected does nothing, and that final step is the one people skip.
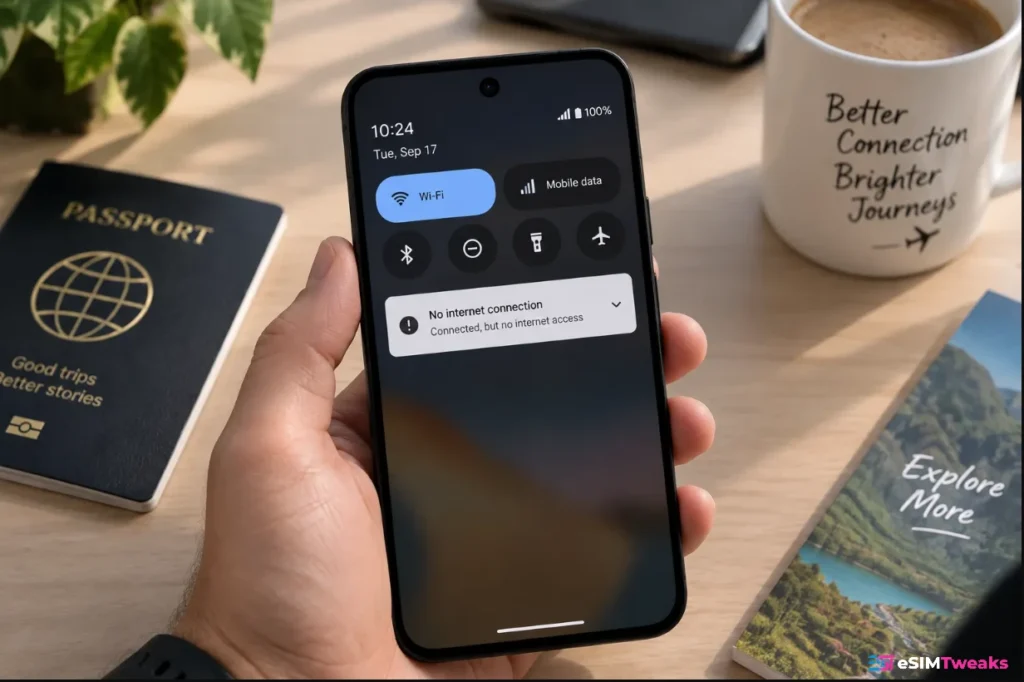
5G is failing to negotiate. Pixel defaults to 5G and some visited networks handle 5G handshakes badly with roaming profiles.
Set Preferred network type to LTE for that line and the connection usually settles immediately. You can also force an operator manually through the Network picker on the same screen.
Adaptive Connectivity is interfering. Settings > Network & internet > Adaptive connectivity now has two toggles. “Optimize network for battery life” downshifts you from 5G to 4G.
“Auto-switch to mobile network” drops you off weak Wi-Fi onto cellular data automatically, and Google’s own warning notes that data charges may apply. Turn the second one off while travelling.
Carrier Services needs clearing. Settings > Apps > Carrier Services > Storage & cache > Clear cache, then restart. This resolves a surprising share of failed downloads.
Things nobody tells you about eSIM on Pixel
A factory reset erases every eSIM profile, and most travel providers will not let you re-download. This is the harshest trap on the platform. Before resetting a Pixel, check whether your provider supports reinstallation.
Pixel travel savings
Save on Your Travel eSIM
Three current offers worth checking before you travel.

Saily
Travel eSIM

Nomad
Travel eSIM

Airalo
Travel eSIM
Airalo, Saily and Nomad all handle it through their apps because the profile is tied to an account rather than the handset. Providers that email you a one time QR code generally cannot help.
Activation codes are single use. Once a QR code has been scanned successfully, it is spent. If you scan it on the wrong phone, you need a new one issued.
There is a known SIM Manager fault on Pixel 9 and 10. Through 2026, users have reported service dropping every few days and requiring a reboot, plus profiles that cannot be re-enabled after being disabled.
Google has not published a root cause or a fix. The practical workaround is to avoid deleting a profile that currently works.
Pixel gives you controls iPhone does not. Preferred network type and manual operator selection sit in plain Settings on Pixel, per line.
When 5G roaming misbehaves in a country, being able to force LTE in three taps is genuinely useful and iOS makes it much harder.
Which providers install most cleanly on Pixel?
Based on how each handles the two Pixel specific pain points, profile reinstallation and APN configuration:
| Provider | Reinstall after reset | APN | Notes |
|---|---|---|---|
| Airalo | Through the app | Automatic | 200+ destinations, account tied profiles |
| Saily | Through the app | Manual on some Android plans | Check the APN value in app before you fly |
| Nomad | Through the app | Automatic | Names its carrier partner per destination |
| GigSky | Through the app | Automatic | Also sells cruise and ferry plans |
| MobiMatter | Depends on the vendor | Varies | Marketplace, so behaviour differs by partner |
Saily is the one to watch on Android specifically. Its APN values have changed between plan generations, so confirm the current value inside the app rather than relying on an older support article.
How much does this matter?
More every year. eSIM penetration on smartphones sat at roughly 5% at the end of 2025 and is expected to reach around 10% by the end of 2026, with the GSMA projecting eSIM connections to outnumber removable SIMs by 2030. Android holds 68.36% of global mobile OS share as of July 2026.
The bottleneck is not technology. GSMA data shows consumer awareness of eSIM climbed from 25% to 60%, but only 8% of those aware learned about it from their own mobile operator.
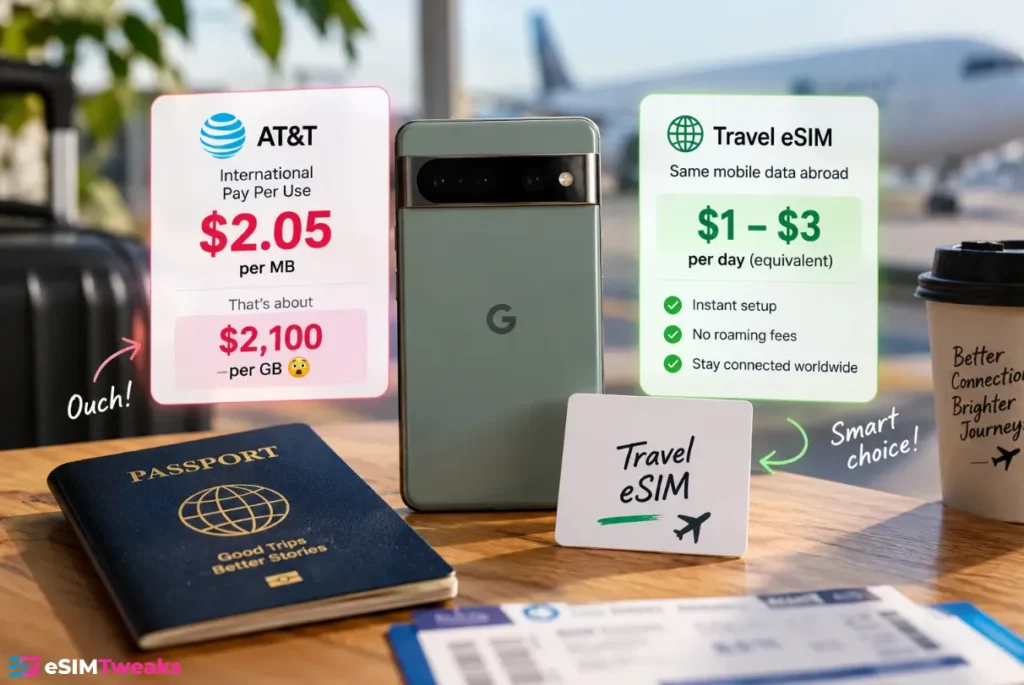
Carriers are not selling this, because a traveller who installs a travel eSIM is a traveller who does not pay roaming charges. AT&T’s international pay per use rate is $2.05 per megabyte, which works out at roughly $2,100 per gigabyte.
A Pixel carrying a prepaid travel eSIM costs somewhere between $1 and $3 a day equivalent for the same mobile data abroad, a gap wide enough to explain why frequent flyers now avoid international roaming charges altogether.
Frequently asked questions
Which Google Pixel phones support eSIM?
Every Pixel from the Pixel 4 onward supports eSIM. Pixel 3 and 3a have regional exceptions covering Australia, Taiwan, Japan and certain carrier units. US models of the Pixel 10, 10 Pro and 10 Pro XL are eSIM only with no physical SIM tray.
How do I install an eSIM on a Pixel without a QR code?
Go to Settings > Network & internet > SIMs > Add SIM > Set up an eSIM, tap “Need help?” on the scanner screen, then “Enter it manually”. Paste the full activation string in the format LPA:1$address$code. Pixel takes the whole string in one field rather than splitting it like iPhone does.
Can I install an eSIM on a Pixel without Wi-Fi?
Not reliably. The profile download needs an internet connection. If you have a working data line already, mobile data will do, but install at home on Wi-Fi wherever possible.
Where is the EID on a Google Pixel?
Settings > About phone > SIM status, listed as EID. For a scannable version, use Settings > Network & internet > Add > “Download a SIM instead?” > Next > “Activating in a store?”.
How many eSIMs can a Pixel hold?
The Pixel 10 stores eight or more profiles with two active at once. Two simultaneously active eSIMs requires a Pixel 7 or later with carrier support. Older models store fewer, and Google does not publish exact figures for the Pixel 7 to 9 range.
Why does my Pixel show signal but no internet on a travel eSIM?
Usually a missing APN or a failed 5G handshake. Add the APN manually under Access Point Names and remember to select its radio button, or set Preferred network type to LTE for that line.
Does a factory reset delete my eSIM on Pixel?
Yes, permanently. Check whether your provider allows reinstallation before you reset. App based providers usually do; providers that issue a single use QR code usually do not.
Can I transfer an eSIM from an iPhone to a Pixel?
Yes, using Settings > Network & internet > SIMs > Add SIM > Transfer a SIM from another phone > iPhone. It requires iOS 26 or later and a supported carrier. Travel eSIM providers are generally not supported, so this works for home lines rather than holiday plans.
Why trust eSIMTweaks.
59 providers tested.
388 speed tests run.
20 countries covered.
More like this
About the author

Director of Research, Pricing & Coverage
I lead pricing and coverage research at eSIMTweaks and maintain the dataset behind every comparison we publish across 200+ destinations. My background is in telecommunications analytics, where I spent six years building rate and coverage models for carrier partners. My analysis determines which providers earn a recommendation.